Similar to commercial "Almond Roca"but better. This toffee is not too hard - easier to chew than some English toffees. David's Mom has made 8 batches for Christmas this year (plus other candy). I think this is the over-all favorite of her holiday candies. Though various family members have additional favorites.
Prepare a jelly roll pan (about 10 x 15 inches with a lip) by lining with aluminum foil and generously buttering the foil. Have ready the following ingredients:
2 cups salted butter (one pound) - bring to room temperature
2 cups sugar - room temperature
2 cups chopped, toasted almonds - divided
1 pound milk chocolate (about 2 2/3 cups of Guittard milk chocolate chips, for example)
It is important that the butter and sugar both be at room temperature, or the candy will separate. Grandma uses cane sugar for candy. You will need an accurate candy thermometer.
Heat butter and sugar together in a heavy saucepan while stirring constantly. When butter and sugar have melted together, attach candy thermometer to the pan with the bulb in the candy. Start with medium-high heat and adjust heat to bring candy to a boil, then to keep it boiling. Boil, stirring constantly and vigorously, for about 5 minutes, then add about half of the chopped almonds. Continue to cook and stir vigorously until candy reaches 300 degrees (optimum final temperature may be slightly different at high altitude or low barometric pressure. You can look up general adjustments for candy making). Be very careful. The thermometer and candy are HOT.
Pour toffee into prepared jelly roll pan. Cool toffee. I think you could probably score the candy for easier breaking before it is completely cool, but Grandma doesn't bother because people tend to want to eat big chunks of it.
When the toffee is cool, melt milk chocolate over hot water (bring water to simmer in a double boiler, remove from heat and place chocolate in the top of the double boiler over the hot water). I think Guittard milk chocolate chips would be a good choice if you don't buy milk chocolate in bulk. If the weather is humid, you might want to use part "milk chocolate dipping wafers" and part milk chocolate to stabilize the chocolate. "Frost" the cooled toffee with the melted chocolate. Sprinkle with remaining chopped, toasted almonds (may not take an entire cup). Cool until chocolate solidifies. Break into pieces and enjoy.
If you wanted something closer to an "Almond Roca" presentation, I believe that you could also score the warm toffee, cool and break it into pieces before dipping in milk chocolate and rolling in chopped almonds. Sounds like a lot of work.
Allergy information: Contains milk products and nuts but no corn or wheat.
Monday, December 20, 2010
Friday, November 26, 2010
Bulgur or Quinoa Dressing

Quinoa Dressing garnished with Giant Italian Parsley
Bulgur Wheat or Quinoa
Thanksgiving Dressing (Serves 4 to 5 as a side dish)
Part
1
Cook over medium heat:
1 1/2 cups chopped onions
1/2 cup chopped celery with some leaves, in
2 to 4 Tablespoons oil and/or unsalted butter until onions are translucent.
Cook over medium heat:
1 1/2 cups chopped onions
1/2 cup chopped celery with some leaves, in
2 to 4 Tablespoons oil and/or unsalted butter until onions are translucent.
Add 1 cup medium to coarse bulgur wheat OR 1 cup (washed or prewashed) quinoa and 1 ¾ to 2 cups chicken or vegetable broth, cover
tightly, bring to a boil, reduce heat and simmer for 20 minutes. Let sit off
heat for 5 minutes. Taste and carefully adjust salt if necessary. It probably
will not need any additional salt if you used salted broth.
Part 2
Microwave 1/3 cup packed sweetened dried cranberries in 2 Tablespoons orange or apple juice or water, until water simmers. Stir, cover and allow to stand until liquid is absorbed.
Shortly before serving, fluff warm quinoa with a fork and add softened cranberries, 2 Tablespoons chopped Italian parsley and 4 finely minced young scallions with some of the tender green parts, or some minced chives. Serve.
Seasoning Tips:
Bulgur Wheat version: The original recipe called for 1/4 teaspoon of poultry seasoning, but I leave it out because I want this dressing to taste different from the more traditional dressing on the table. You can add some black pepper with the onions and celery if using bulgur wheat.
Quinoa version: Try doubling the amount of softened cranberries.
On a day other than Thanksgiving, you can substitute a minced garlic clove or one or two shallots (added with the onion and celery) for the scallions or chives added at the end.
If there is a no-sugar purist coming to dinner, you can leave out the cranberries and garnish the finished dressing with pomegranate arils.
Quantity Cooking:
If you will be eating with a crowd where the kitchen will be busy, a quadruple batch of the bulgur wheat version (Part 1) holds nicely for a few hours in a 6 or 7 quart slow cooker or big covered electric skillet set to “warm”. I don’t know how well the quinoa version holds. Add cranberries, parsley and green onion shortly before serving.
Even after adding Part 2, this dressing re-heats nicely in a microwave. Great for breakfast the day after Thanksgiving.
Alternate Grains and Allergy information:
The quinoa recipe is gluten-free. I think a wheat and milk-free alternative with brown rice and maybe a little wild rice, cooked until done but still chewy, would also be excellent. For a different flavor, try adding some minced green tops from a bulb of fennel and chopping some of the bulb into the dressing, or some fresh tarragon. Consider pressure-cooking brown rice at high altitudes. Or try other grains. Cook enough rice (and/or other grain) in broth to make about 3 1/2 to 4 cups of cooked grain. Add to cooked onions and celery, add additional liquid if necessary for a moister dressing and proceed as above.
You're on your own figuring out equivalent amounts of cooked wild rice, millet, amaranth, quinoa, buckwheat or pearled barley (people who react to wheat gluten may not get along with barley, either). Check basic cooking techniques for these grains online to determine cooking times and the proportions of liquid which will be needed.
This dish could easily be made VEGETARIAN. Just use vegetable broth or water instead of chicken broth and use oil rather than butter.
This recipe can be made free of corn products - check chicken broth and cranberry ingredients.
Stocking Up, Preparing Bulgur Wheat without Electricity:
The classic salad made with bulgur wheat, Tabouleh (AKA Tabouli) generally uses bulgur wheat soaked in hot or cold water, then drained before adding other ingredients.
In an emergency, even if you had no way to heat food and no fresh veggies, you could serve a salad using similar ingredients by soaking medium bulgur in cold water for one hour (or until hydrated), adding dried celery, parsley and onion (not as much as in this recipe) plus dried cranberries or other dried fruit, desired seasonings, a little oil and lemon juice or vinegar. Allow to sit until vegetables re-hydrate and flavors blend, stirring occasionally. Stir in a can of tuna or diced chicken (with the liquid in the can) if you like and serve.
Wednesday, November 24, 2010
Fall Fruits
It's the day before Thanksgiveng. A freeze (26 degrees) is predicted tonight. Time to gather in some apples.
Cranberry salsas
Previewing cranberry salsa recipes:
Fresh Scallions, garlic, lime, jalapeno. Might substitute a little parsley for cilantro, serve cilantro on the side. Salsa in "Yankee Magazine". So traditional!
Ditto, no garlic, more cilantro
Basic enhanced canned cranberry sauce
Enhanced canned cranberry sauce with pears, green onions, cumin. Also a quesadilla recipe
Fresh salsa with Oranges, apples and serrano chiles (I think they mean a 12-oz. bag of cranberries)
Ditto, orange zest, less apple. Turkey taco recipe, too.
Sunday, November 21, 2010
Recipes using less than a can of pumpkin
For people who are concerned about wasting food, pumpkin recipes using less than a can of pumpkin call for recipes which use the remaining amount of pumpkin. A 15 oz. can of pumpkin contains about 1 3/4 cups. A 29 oz. can contains about 3 1/2 cups. Following are some recipes which use less than these amounts. Of course, you could also use home-grown, cooked and pureed winter squash (such as butternut or a variety of pumpkin bred for culinary use rather than display):
3/4 cup pumpkin.
Pumpkin Rice Pudding: No wheat, no eggs.
Pumpkin Bread Pudding 8-inch pan. A little less sugar, more fat than the extravagant pumpkin bread pudding that everybody loves. You could leave out the butter and use a 12-oz. can of evaporated milk in place of cream.
3/4 cup pumpkin.
Pumpkin Rice Pudding: No wheat, no eggs.
Pumpkin Bread Pudding 8-inch pan. A little less sugar, more fat than the extravagant pumpkin bread pudding that everybody loves. You could leave out the butter and use a 12-oz. can of evaporated milk in place of cream.
Saturday, November 20, 2010
Hot Caramel Sauces
Take your pick of Brown Sugar, Vanilla or Maple "caramel" sauces. These sauces are rich and really wonderful on bread puddings, steamed puddings, baked apples and other apple or pineapple dishes, etc.
None of them contain real "caramel" - browned white sugar - or even "caramelized" milk. And they can be a little bit tricky - if cooked too long they could become like candy and if allowed to cool too much, they may turn grainy. But they're worth a little care. So don't cook the sauce too long, and serve it hot or warm.
VERY RICH Dark Brown Sugar Caramel Sauce (See slightly less rich microwave version below)
This sauce is from our favorite pumpkin bread pudding recipe. Its flavor is intense.
1 1/4 cups (packed) dark brown sugar
1/2 cup (1 stick) unsalted butter
1/2 cup whipping cream or heavy cream
1/8 teaspoon salt (optional)
Whisk sugar and butter in heavy medium saucepan over medium heat until butter melts. Whisk in cream and stir until sugar dissolves and sauce is smooth, about 3 minutes.
Microwave (or saucepan) Brown Sugar Caramel Sauce
1/4 cup butter
1 cup packed light or dark brown sugar
1/2 cup heavy cream
In a 4 cup glass measure or deep bowl, microwave butter on High for 45-60 seconds to melt. Whisk in brown sugar and heavy cream until smooth. Microwave on High for 2-2 1/2 minutes until bubbly and slightly thick, stirring once. Serve warm over bread pudding, cake or ice cream.
For a (convenient) double batch using a stick of butter, cup of heavy cream and 2 cups of sugar: prepare in a heavy saucepan, stirring constantly until bubbly and slightly thick.
VERY RICH Vanilla Caramel Sauce (See slightly less rich microwave version below)
I like this variation using about half white sugar and a little vanilla. Vanilla is superfluous in the all-dark-brown sugar sauce. Think of the difference between See's dark brown sugar candy centers and their vanilla caramel centers. The vanilla sauce is convenient for me because I can use the 1/2 cup of brown sugar left over from a pound of brown sugar when I make a double recipe of Pumpkin Bread Pudding. Once I browned the butter before making the sauce. Adds a nice flavor.
1 1/4 cups suger, including at least 1/2 cup white sugar - the rest brown sugar
1/2 cup (1 stick) unsalted butter (may use half salted butter, or you may brown the butter)
1/2 cup whipping cream or heavy cream
1/16 teaspoon cream of tartar (if you want to cook the sauce until it's thicker)
1/4 to 1/2 teaspoon vanilla
Whisk sugar and butter in heavy medium saucepan over medium heat until butter melts. Whisk in cream and cream of tartar (if used) and stir until sugar dissolves and sauce is smooth, about 3 minutes. Cook a little longer for a thicker sauce.
Microwave (or saucepan) Vanilla Caramel Sauce
1/4 cup butter
1/2 cup brown sugar and 1/2 cup white sugar
1/2 cup heavy cream
1/4 Teaspoon vanilla
In a 4 cup glass measure or deep bowl, microwave butter on High for 45-60 seconds to melt. Whisk in brown sugar and heavy cream until smooth. Microwave on High for 2-2 1/2 minutes until bubbly and slightly thick, stirring once. Remove from microwave and stir in vanilla.
Serve warm over bread pudding, cake or ice cream. Photos from a similar recipe here.
For a (convenient) double batch using a stick of butter, cup of heavy cream and 1 cup each brown and white sugar: prepare in a heavy saucepan, stirring constantly until bubbly and slightly thick. Remove from heat and stir in 1/2 teaspoon vanilla.
Maple Caramel Sauce (big batch)
This recipe uses real maple syrup. It is expensive, but I think it's especially appropriate for holidays like Thanksgiving. It's a little thinner than the other sauces (cook it a little longer to thicken it up some) and may need to be stirred occasionally (butter may separate) if you serve at a buffet. I made the recipe below the last time I made Pumpkin Bread Pudding and kept it hot in a small slow cooker. I had a lot of sauce left over for other things like baked apples. This sauce is convenient when you make Pumpkin Bread Pudding because you can use a pound of brown sugar with none left over.
For a somewhat less rich maple sauce, try this one.
1 cup white sugar
1 cup real maple sugar (medium or dark amber - not "Grade A")
1/2 cup brown sugar
1/2 cup (1 stick) unsalted butter
1/2 cup (1 stick) salted butter
1 cup whipping cream or heavy cream
1/4 teaspoon vanilla
Whisk sugar and butter in heavy medium saucepan over medium heat until butter melts. Whisk in cream and cream of tartar (if used) and stir until sugar dissolves and sauce is smooth, about 3 minutes. Continue cooking for a few minutes longer, until the hot sauce is a little thicker than cold maple syrup. If serving at a buffet, keep hot in a small slow cooker. Stir occasionally if butter starts to separate.
Monday, August 16, 2010
Pluots and Sugar Plums
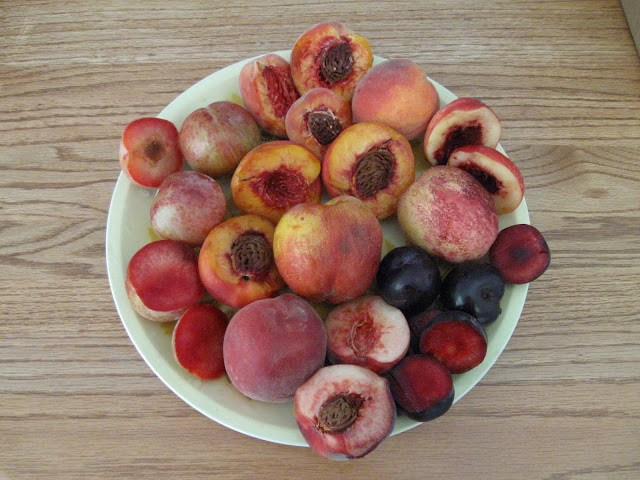
Last week, I picked samples of three varieties of Pluots and our only European plum:

The yellow ones at the top are Flavor Queen Pluots: Pure sweetness - too sweet for some people when fully ripe. Clingstone. This variety does not set fruit easily. I only have a few fruits this year.
To the right are Geo Pride Pluots - tender, flavorful, sweet. Semi-freestone when soft-ripe.
At the bottom are this year's first Sugar Plums - a small European variety which survives in our climate. They can be dried into prunes without special treatment. Sweet, like the typical prune-plum.
On the left are Dapple Dandy Pluots: Bumper crop this year, as most years. Firm, clingstone.
Thursday, August 5, 2010
Summer Fruits
It's been seasonably hot - with highs around 100 degrees for several days, almost 40 degrees cooler just before sunup. The peaches and nectarines appreciate the weather more than the plums and Pluots do. But we have an assortment right now. Here is a platter full of fruits:
At the top are July Elberta peaches - freestone, suitable for canning (much less firm than cling peaches), great for jam, old-fashioned yellow peach flavor fresh. To the right are some of the last Heavenly White Nectarines - also freestone. Sweet, growing on a vigorous tree. Skin is slightly tough. I may not have watered enough when they were small. I would have bigger fruits on both of the varieties above if I had thinned more carefully.
Below the Heavenly White nectarines are some Burgundy plums. They are sweet, firm, quite mild and red all the way through. They hang well on the tree for quite a while without losing quality. Some people find them similar to Bing cherries. Clingstone. Recommended for drying if you're patient enough to cut the fruit off the pit. The blossoms are self-pollenizing and it is a good pollenizer for second-early blooming plums and Pluots.
At the bottom are Snow Beauty peaches. Freestone. A very nice white peach for California. Above them, in the center, are Fantasia nectarines - an old-fashioned, very flavorful variety - not as sweet as some of the newer ones. Freestone. A great fruit. I learned from "Fruitnut" on the Garden Web that this variety may not produce fruit if not watered well early in the season. I did better this year.
To the left are Dapple Dandy Pluots - the most well-known commercial Pluot. It was once promoted as "dinosaur eggs". Some of the mottled skin coloration comes from a plum parent - Mariposa. They grow on a vigorous, prolific tree. The fruit is firm and sweet. Clingstone. Not the most flavorful Pluot available, but still very tasty. There are some similar-looking varieties which ripen at different seasons which are very inferior in flavor. Their inferior flavor is even noted in the wholesale catalog for the trees. So try to make sure you get the real "Dapple Dandy" if you buy some at a farmer's market or something.
Monday, July 26, 2010
Grandma's Chili Sauce
History and Memories
This is one of the best recipes Mom got from her mother-in-law. It became almost mandatory with roast beef, pot roast, hash or meat loaf. It is also good on scrambled eggs (particularly with fried potatoes) and even in slightly messy sandwiches.
As I recall the story, Grandma got this recipe from a woman's magazine back when women's magazines were newly popular. It calls for "50 tomatoes", which is a little less specific than most recipes for processed foods today. Mom decided that this meant "medium tomatoes". I did a rough measurement with 5 tomatoes, and I figure that this amounts to about 5 or 6 quarts of diced tomatoes. Your results may vary.
I have memories of making this chili sauce as a rather big production: scalding and peeling tomatoes, grinding green peppers and onions (best done outside with a sprinkler running to limit tears) in a food mill (meat grinder). I still think the finished product tastes best when the onions and peppers are ground, but it was a messy business, with a little of the juice running down the back of the food mill onto the floor. Today, you can use a food processor if you like. Aim for onions and peppers diced to a size of about 1/4 inch - less than 1/2 inch in any case.
After following Grandma's recipe for several years, Mom decided to substitute whole spices for the ground spices in the original recipe to produce a redder sauce. She ties the whole spices in a cheesecloth or muslin bag so they can be removed after the sauce is cooked down. The longer the whole spices simmer in the sauce, the stronger the flavor they impart. You can add more whole spices if you prefer a spicier sauce.
I compromise, leaving the celery seed swimming in the sauce and bagging the other spices. (I am partial to celery seed). I have used one of the little nylon tulle circles used to tie up bundles of Jordan almonds for wedding receptions. But you run a very slight risk of melting it if you allow the sauce to scorch during cooking.
The biggest change Mom made in this recipe was adding tomato paste at the end of simmering, which drastically cuts down on the time that you need to cook the sauce down until it is thick. Adding tomato paste also means that there is proportionately more tomato and less of the other ingredients in the final sauce. If you wish to increase the amount of the other ingredients for a zingier sauce, feel free.
According to my calculations from a "home cooking" website, a 12-ounce can of tomato paste is roughly equivalent to 6.6 cups of fresh tomatoes, packed (minus a lot of water). This means that 4 cans of tomato paste is about equivalent to the amount of fresh tomato in the recipe. This little comparison also gives you an idea how long Grandma's version has to be cooked down to produce a thick sauce. Mom's new version is thicker than Grandma's version, however (at least as we prepared it). We didn't use any paste tomatoes, either. So the "sauce" between bits of vegetable tended to be somewhat watery. It was still very good.
Jason also got Mom to add jalapeño peppers for an unusual Chili Sauce Picante (or "Salsa") variation.
Ingredients
50 medium tomatoes (about 6 quarts) peeled, cored and diced to ~ 1/4 inch pieces
5 cups vinegar (we use apple cider vinegar - 5% acidity)
6 Tablespoons sugar (less sweet than most commercial chili sauces)
6 Tablespoons salt (preferably non-iodized: check labels of pickling or kosher salt for equivalent amounts)
1/2 Tablespoon cloves (ground in the original, whole in Mom's version)
1 1/2 Tablespoons allspice (ground in Grandma's version, whole in Mom's version)
2 Tablespoons ground cinnamon or 4 sticks cinnamon, broken
2 Tablespoons celery seed
4 green peppers, cores and seeds removed, ground or diced to ~ 1/4 inch
4 onions, ground or diced
For Mom's updated version: 4 twelve-ounce cans tomato paste
For Chili Sauce Picante
Add ten Jalapeño peppers, cores and seeds removed, minced - or other hot peppers to taste. You may wish to add 2 to 4 Tablespoons of coriander seeds, toasted or not, to your spice bag and omit the celery seed, which doesn't seem very "Mexican". Mom uses celery seed.
Directions
Tie whole spices in a cheesecloth or other food-grade cloth bundle, if using whole spices. Combine all ingredients in a heavy-bottomed kettle and simmer briskly, uncovered until thickened. Stir frequently, particularly as sauce thickens. For Mom's version, cook down for about an hour, add the tomato paste and cook for a few more minutes. Stir frequently as above. Remove the spice bundle.
Pack in cup, 12 ounce or pint canning jars, using normal home canning techniques. Leave 1/2 inch head space. Process in a boiling water bath (covered with boiling water) for 12 minutes if sauce is already hot when processed, about 15 - 18 minutes if sauce has cooled significantly before processing, or for larger jars.
Quarter Recipe
It's much less of a project to make a quarter batch, especially if you use a tomato variety that's easy to peel while raw. Blanching even the easy-to-peel ones may be worthwhile if you make the larger batch above.
You can easily process jars in a large kettle, slightly elevated in a steamer insert, if you have a smooth-topped stove which doesn't work with a typical cold-pack canner. Separate canning jars in the steamer insert with clean, wet washcloths to prevent bumping during processing.
I increased some of the ingredients a little to compensate for the addition of tomato paste, for a result a little closer to Grandma's original, but redder and fresher in flavor like Mom's.
12 to 14 medium-sized tomatoes (about 6 cups peeled, cored and diced)
1 1/2 cups real apple cider vinegar
2 Tablespoons sugar, scant
2 Tablespoons salt, scant
1/2 teaspoon whole cloves
1 heaping teaspoon whole allspice
1 stick cinnamon, broken (I used 1/2 stick each of the assertively-flavored flaky Mexican cinnamon sticks and the harder "standard" cinnamon sticks - they're from different species of tree)
2 teaspoons celery seed, scant
1 large green pepper, diced
1 very large onion, diced
1 twelve-ounce can tomato paste
Saturday, July 24, 2010
Melons, Peaches, Nectarines, Pluots, Giant Caterpillar
It has been hot this week -- as expected this time of year in the valley. Melons and other fruits are ripening at an accelerated pace. Here are some I picked today:

At the top left is my all-time favorite melon, Early Sugar Shaw Hybrid Crenshaw. It shows a little sunscald, typical for these melons if you don't protect the fruits. At the top right is a Lilly Hybrid Crenshaw - almost as big as the Sugar Shaw. I'm looking forward to comparing them because seed of Early Sugar Shaw is no longer available (though I still have some seeds). Next to Lilly are two Heavenly White nectarines and three Geo Pride Pluots. Then comes a little slightly sun-scalded Savor Hybrid Charentais melon. Next to it, if identified correctly, is Summer Dream Hybrid. There are two varieties of melon named Summer Dream. This is the orange-fleshed one from Japan. It is cracked. Watered too late in the ripening process. Charentais melons are also very prone to cracking if watered while ripening.
At the bottom of the photo is a melon of whose identity I'm not sure. It could be one of the Crenshaw varieties above, or Sweet Honda, a yellow-skinned, orange-fleshed melon from Japan. But it looks a lot like Lilly (perspective in the photo makes it look relatively larger than the ones in the back). The little pale melon next to it may be an Extra Summer Sweet. Next to it is another yellow melon - Sweet Honda or a Crenshaw. In the center are F.'s volunteer watermelons. The plant these came from had died back, and the melons may be over-ripe. At the left of the photo are four July Elberta peaches and a Dapple Dandy Pluot (firm-ripe).
Giant Caterpillar

Saturday, July 17, 2010
Ripe Green Tomatoes
This weekend, I picked the first fruits from our three varieties of tomatoes which are green (well, yellow-green) when ripe: They're pictured with some orange and yellow tomatoes for comparison. At the top is Absinthe, our largest green tomato, with a smaller specimen below and to the left. On the right side of the plate are three AAA Sweet Solano, orange with yellow stripes. You may not be able to see the stripes. Next are Green Grape cherry tomatoes in various sizes, and some mystery yellow pears for color comparison. Next going clockwise is Green Zebra - green with yellow stripes. Then some orange cherries, most likely Sun Sugar (they were labeled Sun Sugar Red). Then comes the yellow tomato which was supposed to have been Boondocks.

And there were more red and pink tomatoes. At the rights is the unusually pretty pink tomato which was labeled "Black Krim". It was sold along "German Johnson" and "Arkansas Traveler", so it may be one of those varieties. At the bottom is a huge Anna Maria's Heart. Next on the left is a Giant Belgium - not all that giant. Next going clockwise in another big Anna Maria's Heart and a respectably-sized bicolor Orange Russian 117, which has characteristics of both oxheart and regular-leaf tomatoes.


And there were more red and pink tomatoes. At the rights is the unusually pretty pink tomato which was labeled "Black Krim". It was sold along "German Johnson" and "Arkansas Traveler", so it may be one of those varieties. At the bottom is a huge Anna Maria's Heart. Next on the left is a Giant Belgium - not all that giant. Next going clockwise in another big Anna Maria's Heart and a respectably-sized bicolor Orange Russian 117, which has characteristics of both oxheart and regular-leaf tomatoes.

Wednesday, July 14, 2010
Really BIG tomatoes
Temperatures went down a little after our 107-degree day, but the forecast for tomorrow is 105 degrees. On Saturday, the family who brought their kids over for a planting experience this spring came again to pick tomatoes, peppers, squash and nectarines. The garden is producing well.
We have gotten our biggest tomatoes of the season so far. Some varieties which have, up until now, produced smaller tomatoes have delivered some whoppers. Below are the biggest, with some others for contrast.

In the center is the very biggest specimen - deep as well as wide - a German Head tomato. I think it's the biggest tomato I've ever grown. It has on it some cherry tomotoes (they were supposed to be Sun Sugar Red, but they're probably Sun Sugar) and a penny for size comparison. At the top are three pretty hefty Anna Maria's Heart tomatoes. Then clockwise to what was supposed to have been a big pink beefsteak variety (Boondocks) but which is actually a fairly small yellow variety. Then come two big (for this variety, so far) Black Krim tomatoes with a small, striped Black and Red Boar perched between them and a couple of cherries. To the right side of the platter, three Goose Creek tomatoes - one of the size we have been getting until today, the other two quite a bit larger. Pretty tomatoes.
Next to the Black Krim, at the bottom of the photo is a Marianna's Peace - not large for this variety. Then comes a huge red Jet Setter hybrid fruit. There was another just like it. I was really expecting this to be a medium-sized tomato, along the lines of Celebrity. Perched above these are some AAA Sweet Solano fruits. The yellow on orange striping is quite evident today, even if it doesn't show too well in the photo. Next going clockwise are two Brandy Boys (one to the side of the platter) with a small Ponderosa Pink perched between them. The other tomatoes to the left of the platter are a little Barbara fruit (we're getting lots of these, some much bigger than this one) and a dark, very ribbed JD's Special C-Tex. The shape of this one is quite variable. Above it is a small, beautiful, smooth pink fruit with green shoulders which was supposed to be Black Krim. I bought the plant rather than starting it from seed like the plant that produced the Black Krims on the right. Maybe it's a chance cross or mutation. Maybe it's mislabeled.
Variety Comparisons
Black and Red Boar vs. Nyagous: Both of these little tomatoes are smooth and beautiful. (Black and Red Boar is pictured above and here, in the first photo. Nyagous is pictured in the second photo at the link) Black and Red Boar is heavily striped. Nyagous has a dusky blend of colors. The overall color family of both is similar on the outside. On the inside, Black and Red Boar is dusky pink, without the green coloration typical of the "black" tomatoes. It is soft, slightly sweet and quite flavorful. Nyagous shows light vein-like markings on dusky flesh when peeled - quite distinctive and beautiful. Both tomatoes are quite easy to peel, except for the shoulders on Nyagous. Nyagous is also soft, but is juicer, a little sweeter and has a smoky flavor typical of a black tomato. This was a very ripe specimen.
Black and Red Boar gets the nod for its extraordinary appearance, Nyagous for flavor.
Saturday, July 10, 2010
Cucumbers, Climbing Squash Plants, Fruit Tree Pests
Below is a photo of the cucumbers I picked yesterday, with some of the tomatoes we picked at the same time. We got some LONG cucumbers. At the bottom are two Natsuhikari - our first of the season. Then a ribbed Suhyo TK, then the tomatoes, then several Summer Dance cucumbers - not all as perfect as they usually are.

We've had a spider mite invasion of several of our stone fruit trees. Today I sprayed the Heavenly White Nectarine tree pictured below with a jet of water. Much to the consternation of our dog, Maggie. The tree is due for some extra pruning this summer. It's currently losing a few leaves due to the mites. Hope rinsing off the leaves gives predators of the mites a chance. They're very difficult to control with insecticides. You can see one of F's winter squash plants climbing the tree. He planted several of them where they would tend to overtake our plants.

Below is our drenched Warrior Princess Maggie resting after her epic battle with the water hose.

More Interesting Tomatoes
The photo below includes examples of some of the interesting tomatoes developed by Brad Gates at Wild Boar Farms, plus some others. The dusky, striped little tomatoes at the top are Pink Berkeley Tie Dye. Next, going clockwise, comes Beam's Yellow Pear. Then come three Purple Passion, some smaller Evans Purple Pear and then Yellow Submarine. At the bottom are some striped Black and Red Boar specimens. Then comes our mystery yellow pear (extra seedling with a purchased Brandy Boy plant), Haley's Purple Comet - a large oval cherry tomato, then Golden Egg, Grightmire's Pride (an oxheart tomato - my choice today for fresh salsa) and AAA Sweet Solano - a small, oranged tomato striped yellow, with some green markings. In the center are three Orange Russian 117 tomatoes - a bicolor oxheart cross.

The contrast in color between "Purple Passion" and "Evan's Purple Pear is an example of the two varieties of "PURPLE" in the tomato world. The first type, like "Purple Passion" is along the lines of a rosy pink, and comes mostly from the absence of yellow pigment in the skin of ripe tomatoes. Famous older varieties in this category are "Pruden's Purple" and "Aunt Ginny's Purple". The second category of purple tomatoes is a dusky type, often with some green coloration, similar to the "black" tomatoes. It is typified by "Cherokee Purple", which I grew last year. The coloration of "Gary O' Sena" in the photo below is similar to that of Cherokee Purple, one of its parents. The "JD's Special C-Tex" below characterizes the "green shoulder" stage at which this type of tomato is often picked.
The second tomato photo for today includes, at the top, Brandywine OTV (my choice today for a fresh slicer); four little Goose Creek tomatoes; a big, dusky, irregular Gary O' Sena; smaller dusky Nyagous (note the yellower skin tone), two Marianna's Peace specimens; Three nearly-perfect Momotaro tomatoes and several Black Krim specimens of different sizes. In the center, next to the Black Krim are two Anna Russian tomatoes, more typical oxheart shapes than the double one pictured last time. Below them is a JD's Special C-Tex - looking more like a typical small beefsteak than the big boat-shaped specimen last time.

Tuesday, July 6, 2010
Skillet Lasagna with Shredded Zucchini
Tips and Comments
This recipe is a good way to use zucchini or other summer squash when your plants are producing more than you expected. Shredding the zucchini makes this dish palatable to most people who don't like zucchini because of its texture. (You can only eat so much zucchini bread, another favorite recipe for "sneaking in" some zucchini). And the strong flavors of a tomato-based spaghetti sauce mask the flavor of even the darkest green zucchinis, with the overall effect of making the sauce taste milder.
Some of the extra moisture released from the squash is absorbed by the no-boil lasagna noodles as they cook. If you're too rushed to make lasagna, you can add a little shredded zucchini to almost any chunky pasta sauce. Or use part zucchini and part shredded carrots (for a slightly sweeter taste).
Yellow zucchini or straighneck squash looks especially nice in this recipe. It would also work with steamed and flaked-out strands of spaghetti squash. I prefer immature spaghetti squashes (when the rind can still be easily pierced by a fingernail) to ripe ones when serving with a tomato-based sauces. Even if you like ripe spaghetti squash, there are always a few fruits which don't mature to the hard-rind stage by the end of the season. This would be one good way to use them.
The recipe below makes a lot of lasagna. If you wanted to halve the recipe, a 9 x 9 inch baking pan or skillet would allow you to use one sheet of noodles per layer of the Ondine noodles. There are also "no boil" lasagna noodles which look more like the traditional ones, which might be more convenient for this recipe. Or see the 2-layer variation (using only 2 pounds of cottage cheese) at the end of the recipe. It cooks in about 25 minutes after layering the prepared ingredients. It's the one I usually make now.
You could also bake the recipe below in the oven (try 20 minutes at 350 degrees before topping with cheese, or estimate baking time from a recipe on the package of your no-boil lasagna noodles), but it's too hot here to bake right now, so I made it in a big (12 x 16 inch) non-stick electric skillet. I used "no boil" lasagna noodles which came in thin, corrugated sheets, about 8 x 8 inches. I broke them to fit the skillet. The Ondine brand noodles came with a recipe for vegetable lasagna, with no tomatoes, on the package. It includes only vegetables, oil, a little cheese, and chicken broth. The translation wasn't perfect, and I haven't tried it yet.
Ingredients
Vegetable or olive oil
1 large onion, chopped (leave out if kids hate onions)
1 pound very lean ground beef or turkey (optional)
5 to 7 cups coarsely shredded zucchini or other summer squash (remove seeds from really big squashes)
Salt to taste (about 3/4 teaspoon, less if spaghetti sauce or cheese are quite salty)
Freshly ground black pepper to taste
1 large jar (32 ounces) spaghetti sauce
3 pounds (5 1/2 or 6 cups) cottage cheese *
1/4 cup minced fresh scallions or sweet onion
3 to 5 oz. Parmesan or Romano cheese, finely grated
3/4 pound to 1 pound part-skim Mozzarella cheese, grated
No-boil lasagna noodles
Directions
Saute chopped onion in a little oil in the skillet in which you will prepare the lasagna. When onions are translucent and have begun to brown (or caramelize them if you like), add the meat, breaking it up as it cooks. When about half the pink has disappeared from the meat, add the zucchini, salt and pepper and stir into the meat. Cover and allow to cook until the meat is no longer pink and the squash starts to turn translucent .
Adding the zucchini while the meat is partially pink should result in meat which is more tender. If you want the shredded squash to retain more texture in the finished lasagna, add the spaghetti sauce as soon as you add the squash.
Reserve about 1 1/2 cups of spaghetti sauce (to spread over the bottom of the skillet) and mix the remainder into the squash mixture. Allow to simmer for a few minutes, covered. Meanwhile, mix the minced sweet onion or scallions into the cottage cheese, along with 1/2 to 2/3 of the grated Parmesan or Romano cheese.
Spoon squash mixture into a large bowl. Spread reserved spaghetti sauce evenly over the bottom of the skillet. Add a little water to reduce to the consistency of common canned tomato sauce, if necessary.
Place one layer of lasagna noodles over the spaghetti sauce, breaking pieces to fit as necessary. Leave about 1/2 inch between the noodles and around the edges of the skillet.
Working quickly, spoon half of the cottage cheese mixture over the noodles and spread fairly evenly. Sprinkle with about 1/4 of the Mozzarella cheese. Dot with about 1/4 of the squash mixture, and spread it over the cheese layer.
Add a second layer of noodles, perpendicular to the direction you used for the last layer (more or less - don't be too concerned about precision). Working quickly, spread the remaining cottage cheese mixture over the noodles, followed by 1/4 of the Mozzarella cheese and 1/4 of the squash mixture.
Top with another layer of noodles, according to the directions above. Dot with the remaining 1/2 of the squash mixture and spread the mixture to cover all of the noodles.
Cover tightly and simmer (you want some bubbles reaching the top, but not vigorous bubbling) for about 40 minutes, until noodles are cooked through when you test a piece. Mix the remaining Mozzarella and Parmesan or Romano cheeses and sprinkle evenly over the lasagna. Cover and cook for another 5 minutes. (If baking in the oven, do not cover after adding the last layer of cheese). Turn off heat to the skillet but leave it covered, allowing lasagna to rest for 10 minutes. Or remove from oven and allow to rest for 10 minutes. Serve.
* 2-LAYER VARIATION: I later made this recipe using 2 pounds of cottage cheese and only 2 layers of noodles, leaving the rest of the ingredients about the same. I reserved plenty of sauce/squash mixture to go over the cottage cheese layer which topped the second layer of noodles. It cooked faster with only 2 pounds of cottage cheese - in 25 minutes. I still let it rest, covered, with the heat off, for 10 minutes. The time necessary to cook the noodles may vary with the brand of no-boil lasagna.
Allergy Information: We have a friend who is allergic to squash. Some people with a latex allergy have a cross-allergy to squash or to some other foods, especially certain immature fruits (like summer squash). Some varieties of Classico Spaghetti Sauce contain no corn products.
Monday, July 5, 2010
Oxhearts and Others - More Tomatoes
We're starting to get substantial numbers of tomatoes now. Lots of Fourth of July, Early Challenge and First Lady fruits. We've had several Cosmonaut Volkov fruits and some tomatoes which are labeled "Aunt Ginny's Purple", from a second plant which may have been a victim of the "toddler label mix-up" event. They're a tender, meaty heirloom type, but not "purple" or pink. Lots of perfect-looking, egg-shaped Barbara fruits, too. We hit the jackpot with several Pink Oxheart fruits today. One is pictured below with several other varieties:

At 12 o'clock is our first little Royal Hillbilly. The fruit of this variety is usually larger, according to the description. Next to it going clockwise is a small Momotaro, a pink market tomato from Japan. Then a Marianna's Peace, looking more like an oxheart than it should. Then our first Goose Creek, a little bit over-ripe, with cracks at the stem end. You can't see the little white speckles which are sometimes noted on this variety in the photo, but they're there. Next to Goose Creek are three dusky Nyagous, slightly darker in hue than the big, boat-shaped JD's Special-C Tex in the center of the platter. The green on the shoulders is characteristic of many of the "purple" or "black" tomatoes when ripe. Two of the Nyagous fruits are likely over-ripe.
At six o'clock are two Moskvich fruits, then one of the Oxheart Pink fruits. The ones I picked today were variable is size and shape. Not all of them looked this much like a heart. The comes a Ponderosa Pink with some green on the shoulder and a little cracking, and finally a big double heart - Anna Russian. There was also a HUGE double Anna Maria's heart that got stuck in the fencing where two layers overlapped. The second time for this variety. We'll have to find a better one to photograph.
We're still getting a lot of squash, too. And a lot of squash bugs. I had to pull up two plants of Saffron Prolific crookneck this week due to disease. Zucchini plants generally last longer than crooknecks and straightnecks in our yard. And some of F's volunteers. Our 107 degree day was hard on the beans. Haven't had any edible ones since. Still getting a few Summer Dance cucumbers.
First Plums and Pluots
Below is a plate showing, at the top, the superlative Flavor Supreme Pluot, the classic Santa Rosa Plum on the left and Weeping Santa Rosa at the bottom. There is a whole and a cut fruit if each variety . These were picked last week, just as our apricots were finishing up.

Flavor Supreme has lots of sweetness, similar in this way to a typical European plum, but with sprightliness and complex flavor characteristic of an Asian plum. It has a little apricot in its background, along with Santa Rosa and Mariposa plums, which are common in the parent lines of new varieties of plums and Pluots. It tastes best when it first starts to soften, while the skin is still mostly green. It has a bit of crispness at this point. Eventually, the flesh will turn a deep maroon, but by then much of the complex flavor will be gone. My experience this year has been that the fruit can develop a slightly "cooked" or oxidized flavor if it ripens when the temperature gets to 107 degrees. Fruits which ripened after the high heat (daytime highs of about 92 to 99 degrees) were far better. The same was true for the plums below.
Flavor Supreme grows on a vigorous tree with big leaves, but its blossoms are not very attractive to bees. It's a good idea to graft in some early-blooming pollenizers, like the old California commercial plum, Inca, or one of the other early-blooming Pluots. Or, you can plant your pollenizers very close to the Flavor Supreme, or bring over some vases full of blooming branches to place in the tree. Right now, the tree is afflicted with spider mites, and as soon as all the fruit are picked, it's going to be pruned and blasted with a jet of water in the mornings. I've already started spraying the tree with water, trying to avoid the fruit as much as possible.
This year, the fruit is ripening with Santa Rosa, indicating that rain prevented setting of the earliest blooms. As with our apricots. Normally, Flavor Supreme starts to ripen well before Santa Rosa.
Santa Rosa is the classic California Asian plum, introduced by the legendary breeder Luther Burbank. It is tart at the pit and astringent under the skin, with a sweet layer in between which has a lushly complex flavor. It tastes a bit "wild". It is not sweet or firm enough for some modern tastes, but this is a fruit that lets you know you're alive when you eat it. A Santa Rosa at its peak is, in my opinion, a wonderful thing. Some people peel it before eating. Like Flavor Supreme, it loses flavor if over-ripe. It makes very flavorful jams and jellies. Leave the skins on.
The blossoms are self-pollenizing, and this tree is the classic pollenizer for Asian plums and Pluots which need cross-pollination. It has a wide climate adaptability. The tree is vigorous and easy to care for. Perhaps too vigorous for some people. Summer pruning is key to controlling its size. If compatible with your soil, you could also consider planting it on a dwarfing rootstock (the same is true of Flavor Supreme, another vigorous tree).
Weeping Santa Rosa is a Floyd Zaiger development, like Flavor Supreme Pluot. It's one of his earlier releases, now off patent. The fruits grow on a tree with a weeping habit. It is a little sweeter that Santa Rosa (wins taste tests) and ripens slightly later than Santa Rosa. It can be picked when a little firmer and still have great flavor.
Below is our plate of fruit under the Weeping Santa Rosa tree by our front walk. You can see a couple of fruits hanging from the tree next to the daylily blossom. The cut fruit in the photo above is slightly under-ripe. At perfection, the flesh will have a slight rosy blush, a little less than the photo of the Santa Rosa fruit on the left.
Like Santa Rosa, its blossoms are self-pollenizing and can pollenize other varieties. The tree is often grafted onto dwarfing rootstock for ornamental use, but you can also prune it to the shape you like. It has a wider climate adaptability than Flavor Supreme, but probably not as wide as Santa Rosa. The little flower underneath is a cross between a Martha Washington geranium (well, pelargonium) and a scented species. It survives in our climate better than the true Martha Washington types. But the bloom you see lost a petal during the photo session, and it may be our last for the year.

Thursday, July 1, 2010
Olives and Virgin Olive Oil May Reduce Inflammation
In a controlled study, high-phenolic (i.e., virgin) olive oil modified expression of genes involved in inflammation. Some of the affected genes are linked to obesity. Olives may be even more helpful. See comments.
Wednesday, June 23, 2010
First Cucumbers, More Tomatoes
We are starting to get temperatures in the mid-nineties now with 102 forecast for Sunday. Usually this time of year, we ahve had several triple-digit days. The wonderful Blenheim apricots which are now ripening don't have pit-burn this year. We were lucky with this variety this year.
Pictured below, our second cucumbers from the garden (we ate the Cool Breeze before taking a picture). The ridged one in front is Suhyo TK. The one in back is our standby, Summer Dance. Also pictured are some new tomato varieties. Along the edge of the plate above the Summer Dance cucumber is Rosalita. To their left, a heavily-ridged, squat Aunt Ginny's Purple with blossom end rot on the bottom where you can't see it. Beneath are two Early Challenge fruits and between the cucumbers is a plum-shaped Barbara fruit which probably could have stayed on the vine another day. IDs continue below the photo.

Beneath the blossom end of the Suhyo TK cucumber is a little Fourth of July fruit and our largest fruit so far, other than Cosmonaut Volkov, First Lady II. Lined up against the cucumber are three Berkeley Tie-Dye fruits. You may not be able to see the stripes, but there is some faint striping. The smaller fruits in front are Yellow Submarine, Black Cherry and Pop-Ins.
The plate is next to one of F's squash plants. He seems to have planted them where they will overtake many of the plants we planted. He believes that any seed which naturally sprouts in the garden will produce better than a "foreign" seed. At one time, when people planted single varieties, this may have been true. But we get some strange squashes from the F2 generation, offspring of hybrids from the year before.
First Cucumbers
Cool Breeze: Short, stubby gherkin, probably a little larger than you would pick for sweet pickles. Light color. Very crispy, sweet. The plants are not happy where they are planted. Don't think I will get many more fruits. Produces before many other varieties, but is not a heroically heat-tolerant variety like Summer Dance. It needs to be grown on a trellis here.
Suhyo TK: Deeply ridged. Did not peel. Trace of bitterness at stem end, astringent (not in a particularly unpleasant way, tender). Would be a good variety for making cucumber facials. Would probably have some bitterness in hotter weather. This is a tough climate for cucumbers.
Summer Dance: As usual, sweet and tender even with the skin on. No bitterness. A great cucumber for our climate.
More Tomato varieties, following up on our first harvest
On June 18 I picked:
Cosmonaut Volkov: A good-sized tomato, tasty and mildly sweet with light red flesh. Peeled easily without blanching (so did a fully-ripe Fourth of July). Assuming that a certain toddler didn't switch the labels when we planted this section.
First impression of tomatoes picked June 22 and 23:
Pop-ins: Variable red pear or teardrop type, bigger than typical yellow pears. Juicy, pleasant.
Rosalita: Rosy grape tomato with tiny white dots. Sweet, nice fruit.
Yellow Submarine: Bigger than the typical yellow pear. Flavorful.
Black Cherry: Very flavorful. Gel around seeds is green, as expected. I liked the fruits with a touch of green on the shoulder best. Lots of "black" tomatoes are ripe when they still show some green. There was no cracking. This variety is known to crack in some conditions.
First Lady II: Hard to peel when raw, OK for an early tomato, kind of bland.
Early Challenge: Smaller than First Lady II, easier to peel, slightly tastier
Berkeley Tie-Dye: Not as much striping as I expected. Gel around seeds is tart, as expected. Soft flesh. Not as flavorful as I expected. Maybe too ripe?
Aunt Ginny's Purple: Not ripe - picked early because of blossom end rot.
Fourth of July: Fruit ripened in warmer weather is sweeter than the first fruit we got. In my past experience, the flavor of this variety has stood out when the weather got hot. Fruits are relatively hard to peel raw unless very ripe. This is a shame, because the skins are tough.
Update, June 26
Stone Fruits: Yesterday, Marcela came by for some spricots. The little fruits from my volunteer tree are flavorful, sweet-tart and firm, sometimes a little tough or crunchy. Seems more and more like the offspring of a commercial variety. Golden Amber is big, very soft and flavorful. Softer and bigger than Blenheim. I'm not so sure that it's immune to pit burn, as described in catalogs, but it's a good late apricot. We didn't get much of an extended harvest this year due to rain during the bloom season.
Today, I picked a peck or so of Blenheim apricots - luxurious this year with more moderate temperatures. Temperatures are warm enough - mid-nineties - to sweeten up the Arctic Star nectarines. The soft ones are really sugary now.
The Santa Rosa plums at the side of the house are ripening, before the few Flavor Supreme Pluots, which normally start ripening first. Santa Rosas are a jolt of tangy flavor, -- too flavorful for some modern tastes.
Cucumbers and squash: I picked a bunch more Summer Dance cucumbers today - smaller than you would see them in the store. More luxury. Not much going on with the other varieties. Lots of squash on now. Magda is prolific. Diplomat and Kojac are both nice, standard green zucchinis. I pulled up a couple of F.'s volunteer plants which had turned yellow.
Tomatoes: More varieties ripe for the first time this year:
Boondocks Mystery: The mis-labeled Boondocks plant turns out to be a mid-sized clear yellow tomato. Somewhat tart. Plant is diaseased, may come out soon.
Brandy Boy Mystery: The second plant with a purchased plant of Brandy Boy turned out to be a big, mealy yellow pear-type tomato.
Beam's Yellow Pear: Tasty, but not as tasty as Yellow Submarine. Both are thicker at the neck than the common little bland, cute-as-a-bug yellow pear tomato.
Napa Grape: Juicy for a grape tomato. Nice flavor.
Jet Setter: Mid-sized, tasty, quite easy to peel without blanching. One was craced at the stem end, the other wasn't
Better Boy: Tasty as usual. A little softer that Jet Setter. I preferred its flavor today.
Moskvich: Picked an under-ripe one with blossom end rot. Ditto Cosmonaut Volkov, from my first plant. The one picked from the fence resembles it in appearance, so it was probably identified correctly.
Thursday, June 17, 2010
The 2010 Harvest is Underway
It's cooler than normal for June this year. Harvest is well underway, and will accelerate in the next few weeks. We've had tomatoes, turnips and beans. We've had our first stone fruits. And we're getting lots of squash. Below is a photo of some of our early harvest, along with my current favorite hoe, a little triangular one. I also loved my Dad's little crescent-shaped scuffle-hoe, but I've never seen one like it since.


Pests and Diseases
We seem to have Tobacco Mosaic Virus in the yard, particularly in F's volunteer tomatillos. It's spread by touch to all sorts of plants - tomato, pepper, bean, squash, cucumber, melon - just about everything we have planted. Plus ornamental flowers and weeds related to beets (like lambs quarters) and those in the ubiquitous Amaranth family. If plants are not infected early, it usually stunts rather than kills them.
We seem to have Tobacco Mosaic Virus in the yard, particularly in F's volunteer tomatillos. It's spread by touch to all sorts of plants - tomato, pepper, bean, squash, cucumber, melon - just about everything we have planted. Plus ornamental flowers and weeds related to beets (like lambs quarters) and those in the ubiquitous Amaranth family. If plants are not infected early, it usually stunts rather than kills them.
Hope we can convince F that smoking around the plants and touching them actually does spread the disease. Next year, we may need to think of a way to restrict his activities to his own part of the garden without breaking his heart. Tests show that dipping one's hands in milk before handling plants can reduce the spread of the disease. Sometimes plants are also sprayed with milk. I have no clue why this would reduce the spread of an RNA virus. F. doesn't believe that the disease cannot be cured with a "medicine" or that it is spread by touch. He does believe that you can kill a horse by stepping on a scorpion, even if you're a football field away from the horse. It's a challenge to introduce new ideas to him.
Tobacco Mosaic can be seed-borne, which means that my plans for saving seeds and trying a few hybrids may be scaled back. It is persistent in plant debris and soil where plant parts are not fully decomposed.
Squash Bugs have a good start now on our squash plants. They like watermelon plants, too.
First Stone Fruits, 2010

We had a difficult spring for stone fruits this year - lots of rain during blossom time. For the first time, fruit set was sparse on Flavor Delight Aprium. Also on Royalty and Golden Amber apricots, plus my favorite, Harcot. Not much going on with Canadian White Blenheim, either, but this is no surprise, as it needs a late pollinator and is in a marginal zone for winter chill here.
On the other hand, we got a good fruit set on Blenheim apricot, a disease-prone variety. And it is starting to ripen before temperatures reach 100 degrees - unusual around here. No pit burn. It's a great fruit if you're in a climate which is friendly to it. For example, if you live in Santa Rosa, in what was once called "The Valley of Heart's Delight" based partly on the fruits grown there. Various apricot varieties can be quite picky about the climates they prefer. Apricot success here this year is all about the weather.
Back to the start of the harvest season: Our first fruits were little Royal Rosa apricots. They were better this year than in the past. I think that their water was restricted a little as they ripened. They also need to be dead-ripe before you pick them, or they are bland.
Next came Flavor Delight Apriums - nice fruits - and Royalty (Not Royal), a big, mushy fruit on wind-resistant spurs which David likes because it reminds him of his Grandpa's apricots.
Harcots started soon after Flavor Delight. Not many of them, but they were big and luscious.
Some of them are pictured above with Flavor Delight apriums, a little yellow plumcot (blushing to red) from LE Cooke wholesalers and Arctic Star nectarine. The plumcot is an interesting fruit: soft and tender. It loses quality when it goes beyond yellow with a little blush. It has a little bit of a delicate floral flavor. At its best, it's sweet, but can also tend toward being insipid. I think of them as resembling a wild fruit. Wild fruits seem to come in two main types - highly flavored and tart or even astringent, or slightly sweet and tending toward the insipid. This fruit is closer to the latter category. Some people really like them a lot. I think they would be good combined with cranberries for a less-assertive sauce.
They tend to ripen over a very short period of time, especially in years hotter than this one. The tree is compact and attractive, with nice leaves and showier blossoms than most plums grown for fruit. It's easy to care for. It blooms late in the plum season here, and it may cross-pollinate Emerald Beaut - a prized variety of plum. It takes a few years to start blooming, and often blooms on main branches.
Arctic Star white nectarine (the reddish fruit in the picture) are one of breeder Floyd Zaiger's great family of super-sweet fruits. They can be enjoyed firm-ripe or soft and very sweet. The fruits should be thinned more than I thinned them this year, given ample water until they start to ripen, and protected from insects through dormant spraying, garden cleanup, etc. This will help prevent the bitter almond off-flavors and stunted fruits which can occur in white nectarines.
Wednesday, June 16, 2010
Squash Report, June 2010

The yellow squash with the green end is from one of F's volunteer plants - looks like a child of Magda and Zephyr, a remarkable summer squash with some winter squash in its breeding. Your chances of getting squash of quality comparable to the parent plants from seeds taken from a mixed planting of summer squash are not good. Especially when you started with F1 hybrids. The F2 generation often produces some oddities. The bicolor squash in the photo, for example, has a larger seed cavity than its probable F1 parents. The doesn't mean you couldn't get something nice from deliberately crossing two open-pollinated varieties to get your own F1 hybrid.
I used most of the squash in this colander, plus some already in the house, to make two big skillets full of variations on this recipe. One included a diced Ancho (Poblano) pepper, ground red pepper and Pepper Jack cheese. The other included bacon and was topped with Colby/Jack cheese. I think I like a medium or sharp cheddar better than Colby/Jack for this recipe, but you can vary ingredients to taste.
Below is the row of squash we planted. Some of F's volunteers (not pictured) are already turning yellow and sickly, and are ready to be removed from the garden. They're scattered in odd places. He also planted winter squashes of unknown parentage. Good hosts for next year's crop of squash bugs. He seems devoted to growing them, though. Gives them to friends in the fall.
We already have big adult squash bugs mating, plus nymphs. They can get out of hand fast. Grateful we don't have squash vine borers or cucumber beetles.

Saturday, June 12, 2010
First Tomatoes and Beans, Last Summer Turnips 2010

Well, our first tomato was a little currant tomato, variety "Sweet Pea". Not bad. There were also a couple from a mis-identified "Fourth of July" plant that turned out to be a tiny, crunchy grape tomato - Not outstanding. We had a Stupice tomato ripening, but lost it, along with a few others of the 61-plus plants we planted. Interestingly, all of the plants lost were either purchased rather than started by us, were over-wintered or were planted where a diseased plant came out.
Our second harvest includes a few tiny Sweet Pea and "Fourth of July Mystery" tomatoes, plus one larger (still not very big) real "Fourth of July" tomato. They're pictured above with the last of the "Summer Turnips", variety - Oasis. Still good. Only a hint of the off-flavors which develop in turnips during hot weather. We've had variable weather this spring, but it's been cooler than normal lately, in the 70s and 80s during the day.
Also pictured, pole beans "Fortex", perhaps the best pole bean in the world, and a heat-tolerant variety, "Champagne". A bean specialist gave me some seeds to try. I only planted a few plants, as pole beans are usually marginal on our spring weather. I typically like them small, but a few got away from me, going to the "beany" stage that David's Mom likes. There's also a sprig from the "Grenada" pomegranate, with a baby fruit and blossoms. Not enough tomatoes to provide color. They needed some help. We should have a bunch soon.
Honors for Biggest Green Tomato go to "Anna Maria's Heart". This is a surprise, as it is listed as a late variety. Healthiest-looking Plant award goes to "Nyagous", a smallish "black" tomato.
Update June 15: Anna Maria's Heart produced a ripe tomato. It had been squished against the fence support, and had some bad spots. This is the first time I've grown oxheart tomatoes. I think I'm going to like this one. Sweet and meaty so far. It's pictured below with what is probably "Sweet Million" plus some more currant and grape tomatoes in the little bowl and "Sweet Quartz" (a Japanese cherry tomato named for the color of Rose Quartz) on top of the beans.
'Champagne' pole bean is out-producing 'Fortex'. Champagne is a flatter bean and has strings - just like old-time string beans with less-elegant names like 'Turkey Craw' or 'Blue Greasy Grit'. I hope to try Fortex again in the fall.

The difference in hue between the "pink" Anna Maria's Heart and Sweet Quartz and the "red" tomatoes in the bowl is not particularly evident in the picture, but the "pink" tomatoes have less yellow pigment in the skin when fully ripe. The "Sweet Millions" pictured here were sweet and a little on the mealy side. Hard to judge quality on these first tomatoes. "Sweet Quartz" was juicier with more complex flavor. It's large for a cherry tomato.
Below is a row of our tomato plants with the June 15 vegetable harvest. "Nyagous" is in front, with dark foliage to go with its dark-colored tomatoes. There are four of these rows, plus extra plants along the dog-run fences.
I was successful at emasculating some blossoms for hybridization, but not at drying and transfering pollen. I'll probably skip further hybridization experiments until next year because of the tobacco mosaic virus in the yard. We will likely lose the "Brandywine OTV and "Haley's Purple Comet" to disease. I think I can get some fruits from the latter variety first.

Saturday, May 15, 2010
More melons, second-string tomato plants
We have lost three tomato plants: The Red October which lived over the winter in a little cup did not make it in the garden. I replaced it with Stupice a while ago. The Winter Red which similarly lived over the winter was apparently eaten by a gopher. It was replaced today with an extra plant of "Barbara", which had developed a few lesions on the lower leaves while waiting to be planted, like some of our other remaining plants in pots. "Mortgage Lifter" (from Target, I think), was sickly yellow and had lesions which looked like the pictures of Alternaria. It was replaced today with either Sweet Million or Sweet Olive, depending on which tag you believe. I guess the plant habit will have to provide clues as to which one it is.
Also prepared mounds for and planted more melons: Oka, Sweet Honda, Extra Summer Sweet, Lilly, Early Sugarshaw. Had some help from a little boy for whom gophers were a great mystery. Kind of slowed me down, but that's what little kids are for.
Also prepared mounds for and planted more melons: Oka, Sweet Honda, Extra Summer Sweet, Lilly, Early Sugarshaw. Had some help from a little boy for whom gophers were a great mystery. Kind of slowed me down, but that's what little kids are for.
Subscribe to:
Posts (Atom)